Adding a tray to an existing printer

Contents
The instructions below are intended for DMV internal Customer Service Centers.
Before You Begin
1.Gather a list of all your office’s workstations on the front counter. The printer change will need to be completed on each CSC work station.
2.If you add a printer tray, you will need to update the printer configuration on each Windows workstation in the CSC.
3.Ascertain the administrator account user name and password for each Windows workstation.
Configure the Windows Workstation
![]() The following steps are to be followed for EVERY workstation at the CSC.
The following steps are to be followed for EVERY workstation at the CSC.
1.Log into the workstation with an administrator account user name and password.
2.From the Windows desktop, click Start Globe ![]() then click on Devices and Printers (on the right side). This will open the Devices and Printers dialog. Select the printer that was changed and right-click. Choose Printer Properties from the sub-menu.
then click on Devices and Printers (on the right side). This will open the Devices and Printers dialog. Select the printer that was changed and right-click. Choose Printer Properties from the sub-menu.

3. The printer Properties opens. If a new Tray is added to the printer, choose the Device Settings tab.
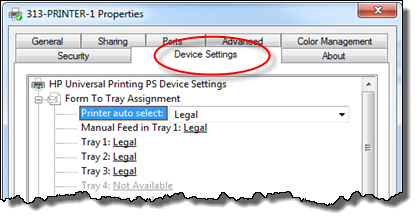
4.Use the side scroll bar to locate Installable Options.

5.Select the Tray to Install and change the drop-down to “Installed”. Then use the side scroll bar to return to the top of the tab.

6.Choose the new tray that was just installed and select “Letter” from the paper type drop down. Click the Apply button to complete the change.
