Installing a Printer in the CSC

Contents
The instructions below are intended for DMV internal Customer Service Centers.
Before You Begin
1.Gather a list of all your office’s workstations on the front counter. The new printer will need to be added to each.
2.Ascertain the administrator account user name and password for each Windows workstation.
Configure the Windows Workstation
![]() The following steps are to be followed for EVERY workstation at the CSC.
The following steps are to be followed for EVERY workstation at the CSC.
1.Log into the workstation with an administrator account user name and password.
2.From the Windows desktop, click Start Globe ![]() then click on Devices and Printers (on the right side). This will open the Devices and Printers dialog. Click Add a Printer.
then click on Devices and Printers (on the right side). This will open the Devices and Printers dialog. Click Add a Printer.
 |
| Click to view full size |
3.When the Add Printer dialog opens, click on Add a local printer.

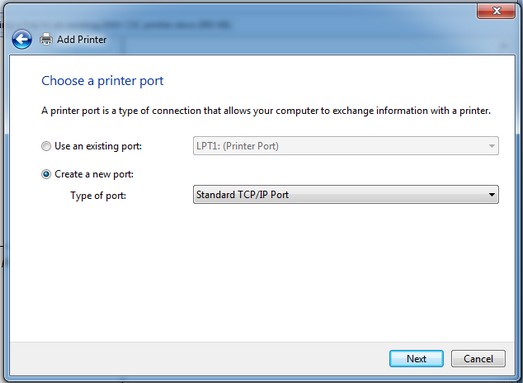
4.The Choose a printer port dialog opens. Select the Create a new port button. From the Type of port drop down list, select Standard TCP/IP Port and then the click Next button.
5.The Type a printer hostname or IP address dialog opens. Enter the IP address for the printer in the Hostname or IP address field. The Port name will automatically populate as you type the IP address. Click the Next button.

6.The Install the printer driver dialog opens. All CSC printers will be installed with HP Universal Printing PS driver.
7.Scroll down and select HP under the Manufacturer column. Then scroll down and select HP Universal Printing PS under the Printers column. Click the Next button.

8.The Which version of the driver do you want to use? dialog opens. Click the Replace the current driver radio button.

9.The Printer Name dialog opens. Type the printer name with the following format LOC-PRINTER-X where LOC=location code for the CSC and X=the printer number used by CSC (see example below). Click the Next button.

10.Once the printer has finished installing (this may take a few minutes), the Printer Sharing dialog opens. Click the Do not share this printer radio button, then Click the Next button.

11.The Successful install dialog opens. Verify the Set as the default printer is NOT selected. Click the Finish button to complete the installation.
