Maintain Proof of Legal Presence/Residency
The Maintain Proof of Legal Presence/Residency screen is used to enter a customer's Legal Presence documents if there is a legal presence stop or there is no legal presence documentation on file and/or Residency documents need adding or updating.
![]() For a list of Legal Presence codes, click Here.
For a list of Legal Presence codes, click Here.
To update Legal Presence/Residency
1.If not already open, Open the Customer Console using the customer's number or name.
From the Console Go To ..... |
Steps to Follow ..... |
||
Alerts Grid |
If the customer needs to provide legal presence documents, the following alert will display:
1.Clicking the 2.Continue with the steps below. |
||
Transaction Menu |
1.Click the Transaction Menu button in the Main Menu Bar. 2.Navigate to Customer Transactions>Customer>Maintain Proof of Legal Presence/Residency(CUIDNM) and click it. The Maintain Proof of Legal Presence/Residency Inquire form opens. 3.Click the Inquire 4.Continue with the steps below. |
||
Command Line |
1. Enter CUIDNM on the Direct command line, then press the Enter key. 2. The Maintain Proof of Legal Presence/Residency transaction form opens. 3. Continue with the steps below. |
||
Quick Navigation |
From the Maintain Proof of Legal Presence/Residency screen Click the Quick Navigation •CHGADR (Change All Addresses) •CICARD (Issue ID Card) •COMORD (Compliance Update) •CUSTID (Change Customer Number) |
2.When the Maintain Proof of Legal Presence/Residency screen opens. Enter the Residency and/or Legal Presence information.
![]() Depending on the customer's proof of Legal Presence, verification may have to be done via the SAVE or Passport Verification interface. Click here for a list of Legal Presence Codes.
Depending on the customer's proof of Legal Presence, verification may have to be done via the SAVE or Passport Verification interface. Click here for a list of Legal Presence Codes.
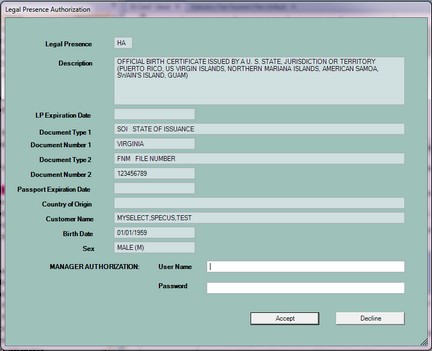
![]() Before completing the maintenance for the Legal Presence information, the Legal Presence Authorization window will pop up. Your manager or designee will review the Legal Presence information entered to verify what was entered.
Before completing the maintenance for the Legal Presence information, the Legal Presence Authorization window will pop up. Your manager or designee will review the Legal Presence information entered to verify what was entered.
If the customer is using an unexpired passport as the Legal Presence code, mySelect will verify with U.S. Passport Verification Services (USPVS) before the credential is issued. See Passport Verification for more information. Use the Scan Documents button found in the Keys tab to scan the documents presented. Follow the instructions in the DLG-0202 for scanning the documents presented.
After your manager or designee has reviewed the information, they will complete the authorization by entering their (COV) User Name and Password which will allow the transaction to continue. Self authorization will not be allowed.
Click the Accept button to complete the authorization and continue the transaction or click the Decline button to exit the authorization and go back to re-enter the information.
3.Click the Process ![]() button. The transaction is processed and the Transaction Details dialog appears displaying the TRANSACTION PROCESSED message.
button. The transaction is processed and the Transaction Details dialog appears displaying the TRANSACTION PROCESSED message.
•Click the LP Acknowledgment ![]() button to reprint the LP Acknowledgment form.
button to reprint the LP Acknowledgment form.
•Click the Cover Sheet ![]() button to reprint the Document Imaging Barcode Cover Sheet.
button to reprint the Document Imaging Barcode Cover Sheet.
4.A Document Imaging Barcode Cover Sheet and Legal Presence Acknowledgment form will print if the customer is providing LP for the first time and has a valid license or ID card and no LP stop exist.
![]() If the customer has LP already on file and needs to change it, a new license or ID card will have to be issued and the new LP code entered during the reissue process.
If the customer has LP already on file and needs to change it, a new license or ID card will have to be issued and the new LP code entered during the reissue process.
If using CUIDNM to comply the LP stop, a confirmation message box will display whether to print the cover sheet and LP Acknowledgment form. Click Yes to print the two forms or No to bypass printing.

5.After the acknowledgment form prints, the customer, CSR and verifier must sign and date the form then scan into OnBase along with other documents.
6.If a change is made to the Residency field, the acknowledgment form will NOT print.
7.Click the Close ![]() button to close the Transaction Detail dialog.
button to close the Transaction Detail dialog.
See Also
For more information, see the Driver's Licensing Guide

