Sending a DL9 and Receiving a Response

Contents
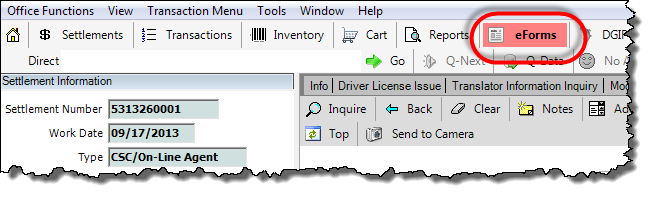
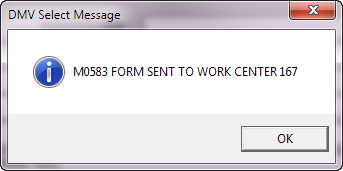
1.If not already open, Open the Customer Console using the customer's number or name. 2.From the main button bar, click the eForms 3.Click the New DL9 Form 4.Use the Fill button to populate the customers personal information. Enter the vehicle title number and click the Fill button again to populate the vehicle information. 5.From the To Location list, pick the location number of the work center you're requesting assistance from. 6.Enter the applicable information, including the Instructions. 7.Click the Send button. The confirmation dialog appears. 8.Click the OK button. 9.Click the Close
|
|
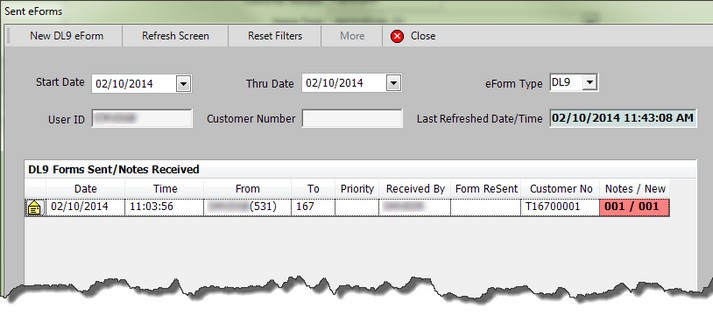
1. From the main button bar, click the eForms 2. Select DL9 from the drop down in the eForm Type field and then click the Refresh Screen button to view the list of DL9's sent from your location. To view a range of dates, change the Start Date to the desired date. 3. To view a DL9 sent from your location, click the Mail 4. The open DL9 can be resent to the original location or sent to a different location. Just change the To Location, update any necessary fields and include instructions. 5. Click the Send button. The confirmation dialog appears. 6. Click the OK button. 7. Click the Close |
When the work center has responded to the DL9 request, the eForms button displayed in red. Just remember, it's RED until it's READ!
To view the response: 1.Click the eForms button. The Forms dialog appears. 2.Select DL9 from the drop down in the eForm Type field (clear out the customer number in the Customer Number field if present) and then click the Refresh Screen button to view the list of DL9's sent back to your location. 3.In the DL9 Forms Sent/Notes Received section, click the mail
4.In the Form Replies section at the bottom, click the View 5.When done viewing, click the Close |