Vital Record Paper Inventory

Vital Record Paper Inventory has to be assigned to the work area printer before the transaction begins in order to accept the document number(s). Until the document numbers are entered for a Print Match, the VDH transaction will be in Pending Status. (Similar to title document transactions)

Prerequisite:

Add the Vital Record Paper document number series to External Agencies>VA Dept of Health>Vital Record Paper inventory.

Toggle_ExpandedAssigning Vital Record Paper Inventory to the printer

1.   Click the Button_Inventory button on the Main Button Bar. The Inventory Management Console window is  displayed.

2.   Click the ico_plus to the left of the External Agencies to display the list of external agencies.

3.   Click the ico_plus to the left of the VA Dept of Health to display the list of VA Dept of Health items.

4.   Click the ico_plus to the left of the Vital Record VS-15B Paper OR Vital Record VS-15C Paper to display the secure paper inventory pack(s).

5.   Using the mouse, right click on the desired pack inventory and then left click on the Open Vital Record Pack. This will open the Assign Vital Record Paper Inventory window.


Click to view full size

6.   Click on the Button_DownArrow button under Select Printer where Vital Record pack will be assigned. Select the printer name where the Vital Record paper will be used.

7.   Click the Button_VDH_Assign_Pack button (top left of window) to assign the pack to the printer. mySelect will display a message box stating the pack was successfully assign to the printer. Click OK to continue.

8.   Click the Close Button_Close button in the Assign Vital Record Pack window to exit this window.

9.   The Inventory Management Console now shows the Vital Record Paper with the Inventory_Red_Dot indicating the paper has been assigned to the printer.

Toggle_ExpandedClosing the Vital Record Paper Inventory at the end of the day

1.   Click the Button_Inventory button on the Main Button Bar.  The Inventory Management Console window is displayed.

2.   Click the ico_plus to the left of the External Agencies to display the list of external agencies.

3.   Click the ico_plus to the left of the VA Dept of Health to display the list of VA Dept of Health items.

4.   Click the ico_plus to the left of the Vital Record Paper to display the secure paper inventory pack(s).

5.   Using the mouse, right click on the inventory pack to be closed and then left click on the Close Vital Record Pack. This will change the icon to a check mark in the Inventory Management Console indicating the Vital Record Paper pack has been closed.

Toggle_Expanded   Correct VDH-Vital Record Paper Inventory after processing

notes20pxCorrecting inventory is allowed on a prior settlement as long as the settlement is not closed.


1.Click the Transaction Button_Transactions button and recall the log of the DVRRBC or DVRADL transaction that needs the inventory corrected.

2. Click the Details Button_Details button to open the Transaction Details window and then click the Inventory Details Button_InventoryDetails button to open the Inventory Details window.

3. Click the Button_Right_Triangle button next to the inventory that needs correcting. This will highlight the line chosen and activate the Correct Item button. Click the Correct Item Button_CorrectItem button to open the New Item field.

4. Enter the new Vital Record Paper Inventory control number in the New Item field.

Click to view full size


5.Once the New Item is entered, the Save New Item Button_Save_New_Item button becomes active. If the item entered is correct, click this button. If you need to cancel this correction, click the Cancel Button_CancelInventory button and start over from step 3.


6.After clicking the Save New Item button, the New Item number entered displays in the inventory line. Click the Process Corrections Button_Process_Corrections button to process the correction.

Click to view full size


7.mySelect will display the following message. Click OK to continue.

Inventory_Correction_MSG

8.Click the Close Button_Close button in the Inventory Details window.

9.Click the Close Button_Close button in the Transaction Detail window to complete the transaction.

Toggle_Expanded   Updating Processed Pending Inventory

In cases where the VDH transaction is in a Processed Pending status and document paper inventory needs to be selected, follow the steps below to select the paper needed to process the pending transaction. The CSR will not be able to close their cash drawer until the document is printed.


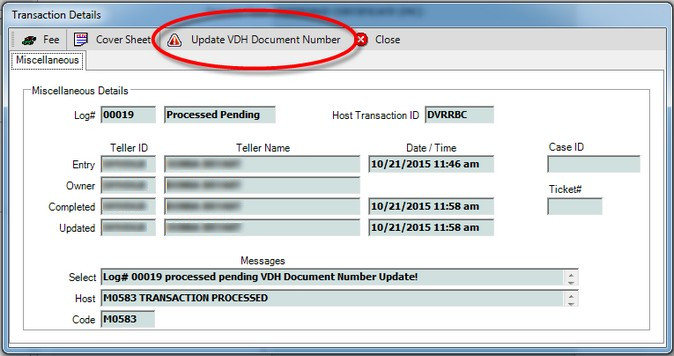
1.The pending DVRRBC transaction is indicated by the * in List Transactions. Recall the pending transaction by clicking the Select Button_Select_ListTrans button next to it.

Click to view full size

2.When the VDH Request (Step 2 of 2) opens, click the Details Button_Details button to open the Transaction Details dialog.

Click to view full size


3.Click the Update VDH Document Number Button_VDH_Document_Number button to update the VDH paper document number.

VDH_Process_Pen_Inv_TransDetails


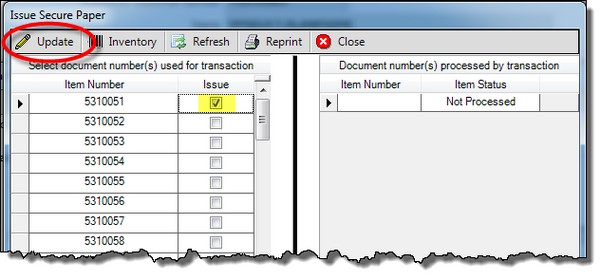
4.The Issue Secure Paper window opens. Select the VDH document number to be used and then click the Update Button_Update button.

VDH_Process_Pen_INV_IssPaper

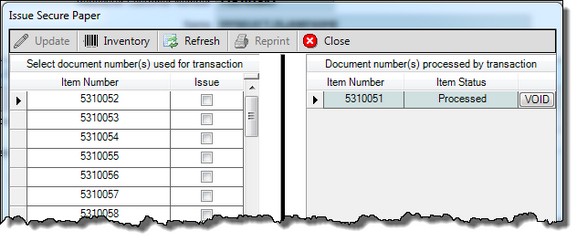
5.mySelect will process the transaction and populate the document item number in the Item Number column and change the status to Processed.

VDH_Process_Pen_INV_IssPaper_Processed

6.Click the Close Button_Close button in the Issue Secure Paper window. The following message box displays.

VDH_Process_Pen_Inv_MSG1


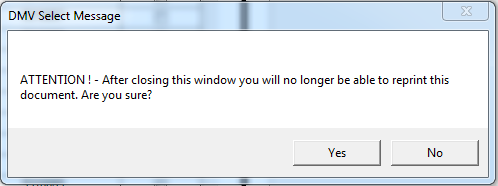
7.Click No to go back to the Issue Secure Paper window.

8.Click Yes to continue. The Transaction Details window opens and the Select message now says processed!

9.Click the Close Button_Close button in the Transaction Detail window. The Additional Copies message displays.

VDH_AddlCopies

10.If no additional copies are requested, Click the No button.  To print additional copies, click the Yes button.   See Additional Copies.

11.Click the Close Button_Close button in the VDH Request (Step2 of 2) screen to complete the transaction.

Topic Last Edited: 10/21/2015