Add Inventory

Contents
![]() This function is reserved for Lead Tellers and Manager roles.
This function is reserved for Lead Tellers and Manager roles.
Adding Inventory is performed from the Inventory Management Console.
![]() All inventory types are added following the same process described below.
All inventory types are added following the same process described below.
![]() Please reference the following operational procedures (ignoring data entry instructions for CSCnet):
Please reference the following operational procedures (ignoring data entry instructions for CSCnet):
•Inventory Control - Receiving Decals/Permits/VIN Plates - CSCOM-301
•Inventory Control Receiving License Plates - CSCOM-302
•Inventory Control - Receiving Title Documents - CSCOM-303
•Inventory Control - Ordering/Receiving IFTA Decals - CSCOM-305
To Add Inventory
1.If the Inventory Management Console is not already open, from the main button bar, click the Inventory button. The Inventory Management Console appears.
2.Click the ![]() next to the inventory type to add. This expands the item list.
next to the inventory type to add. This expands the item list.
3.Continue to click the ![]() button to expand the list until you get to the specific inventory item.
button to expand the list until you get to the specific inventory item.
4.Select the inventory item.
5.Right-click to display the pop-up.
6.Click Add inventory item, with inventory item replaced with the type you're adding.
The Add inventory item dialog appears.

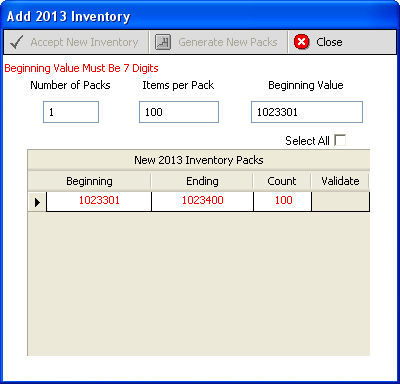
7.In the Number of Packs (the name of this field depends on the inventory type you're adding) field enter the number of packs to be added.
8.If necessary, change the value in Items per Pack (the name of this field depends on the inventory type you're adding). The value initially displayed is the default number of items in a pack of the particular inventory type as follows:
Inventory Type |
Default Number of Items in a Pack |
|---|---|
Decals |
100 |
Titles |
200 |
Plates |
50 |
Permits |
20 |
VIN |
100 |
Dealer Temp Tags |
10 |
9.In the Beginning Value field enter the beginning value.
10.Click the Generate New Packs button (the name of this button will be applicable to the type of inventory you're adding). The inventory item(s) is displayed.
The system will check to confirm inventory items of the same number do not already exist in your inventory. If they do, see Duplicate Inventory Found.

Add Decals
11.Click the Validate checkbox for each item you would like to add. If you have multiple packs and want to add all of then, you can click the Select All checkbox.
12.Click the Accept New Inventory button. The inventory is now added to the location you're logged into.
1.If the inventory being added duplicates inventory already existing in your inventory, you will receive the following message:
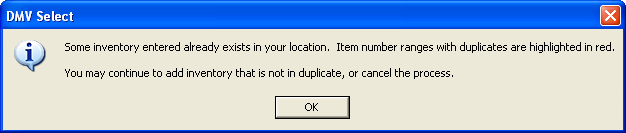
Click OK to close the dialog. The Add Inventory dialog appears with the duplicate inventory items highlighted in red. The Validate checkbox is not present to prevent the addition of duplicates.
If there are packs which are not in duplicate, continue with the Add Inventory process above; otherwise, click the Close ![]() button to abandon the process.
button to abandon the process.
See also