Split Decal Pack
![]() This function is reserved for lead/management level roles
This function is reserved for lead/management level roles
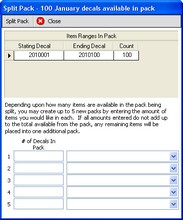
Decal packs can be split across multiple tellers using the Split Decal Pack feature, rather than Assign Decal. In times when you're running out of decals, this is a good way to distribute what's left across multiple tellers.
To split a decal pack
1.If the Inventory Management Console is not already open, from the menu bar, click the Inventory button. The Inventory Management Console appears.
2.Click ![]() next to Decal.
next to Decal.
3.Click ![]() next to the Month, Rental, or Year item, depending on the type of decal you're assigning.
next to the Month, Rental, or Year item, depending on the type of decal you're assigning.
4.Continue to expand the items until you're at the discrete value of either month or year, depending on the type of decal you're assigning. .
5.Identify the range of decals representing the pack you would like to split.
6.Right-click to display the pop-up. Three choices appear; Assign, Void Inventory, and Split Pack.
7.Hover over Split Pack. The Split Pack dialog appears.
8.In the # of Decals In Pack field enter the total number of decals to assign to one teller.
9.Click the down arrow to the right, then select the teller's name from the list.
10.Repeat this process for each pack to be created.
11.When done, click the Close ![]() button.
button.
![]() If all amounts entered do not add up to the total available from the pack -- as displayed in the blue title of the dialog -- the remainder will be assigned to the teller performing this function. A message appears advising you of this.
If all amounts entered do not add up to the total available from the pack -- as displayed in the blue title of the dialog -- the remainder will be assigned to the teller performing this function. A message appears advising you of this.
A message then appears advising the splitting of the pack has been successfully completed.
12.Now the tellers must Verify the new inventory packs using Verify Decals.
See also

