Decal Management Overview
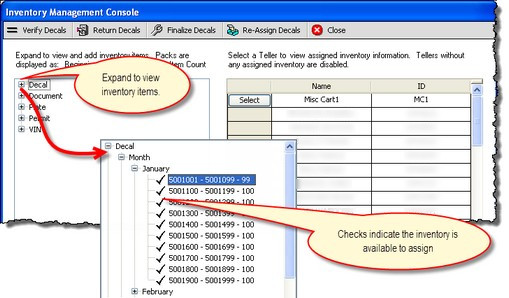
Decals are managed from the Inventory Management Console, which is accessed from several locations:

Inventory Management Console
1.From the main window's button bar by clicking the Inventory ![]() button.
button.
2.From within the Open/Close Console by clicking the Inventory ![]() button.
button.
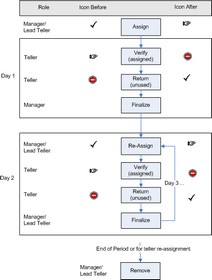
A teller is assigned decals and they remain assigned to the same teller until they are all used. At the close of business each day, whatever is left is "returned" to the decal custodian, then re-assigned to the same teller the next day. At a point in time when the decals are out of date or need to be re-assigned to another teller, they are "removed." The decal flow is as follows:
1.Assign Decals (or Split Decal Pack to split one pack across multiple tellers) 2.Verify Decals - Teller verifies after begin assigned. 3.Return Decals - Teller returns decals at end of work day. 4.Finalize Decals - Manager confirms -- finalizes -- decals at the end of the work day. 5.Re-assign Decals - Manager re-assigns to teller(s) at the beginning of the work day. 6.Remove Decals - Decals are removed from one teller to be given to another. This clears the decals from the Re-assign Decal dialog. |
Once Decals have been received, the Decal ranges appear in the Inventory Management Console with the following icons. If there are no icons, go to Receive Inventory.
|

