Change All Addresses
Customers are required by law to change their address with DMV within 30 days of moving to the new address. The customer has the option of changing their address by telephone, Internet, or by visiting a Customer Service Center or DMV Select office. Customers who come into a DMV Select office can change their address on DMV files at no charge.
The Change All Addresses transaction is used to change or correct the customer's primary mailing address and/or dwelling address.
To Process an Address Change (mailing and dwelling)
If not already open, Open the Customer Console using the customer's number or name.
From the Console Go To ..... |
Steps to Follow ..... |
||||||||||||||||||||
|---|---|---|---|---|---|---|---|---|---|---|---|---|---|---|---|---|---|---|---|---|---|
Alerts Grid |
If there is an issue with the customer's address(es), you may see one or more of the following alerts:
1.Clicking the 2.Continue with the steps below. |
||||||||||||||||||||
Quick Navigation |
1.Click the Quick Navigation 2.Select Change All Addresses, the Change All Addresses transaction form opens. 3.Continue with the steps below. |
||||||||||||||||||||
Transaction Menu |
1.Click the Transaction Menu button in the Main Menu Bar. 2. Navigate to Customer Transactions>Customer>Change All Addresses (QAS EX) (CHGADREX) and click it. 3. The Change All Addresses transaction form opens. 4. Continue with the steps below. |
||||||||||||||||||||
Command Line |
1. Enter CHGADREX on the Direct command line, then press the Enter key. 2. The Change All Addresses transaction form opens. 3. Continue with the steps below. |
||||||||||||||||||||
Quick Navigation |
From the Change All Addresses screen Click the Quick Navigation •Change Name |
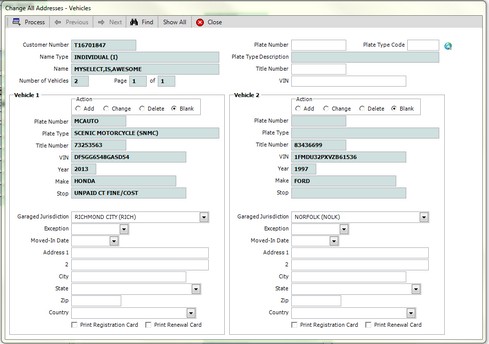
After opening the Change All Addresses form, click the Vehicles
The Change All Addresses - Vehicles form opens. This form displays information about each vehicle (two at a time) the customer owns. Fill in the bottom half of the form with the vehicle registration address and other information as needed, then click the Process Click the Print Registration Card box to print a new registration card. Click the Print Renewal Card box to print a renewal card.
|
1. In the Customer Information section, select Yes, No, or No Response, or Blank for U.S. Citizen and Voter Registration. The Reset radio button will clear any choice made.
1.Scroll down to the Primary Mailing Address or Dwelling Address section, depending on which address you wish to change.
2.After providing the required information explaining the need for the change to the address, you can change the address by either allowing a United States Postal Service (USPS) look-up, or manually entering the new address. See USPS Address Verification
3.When done entering the required information, scroll down to the Print Information section. Provide an answer for printing new vehicle registration cards.
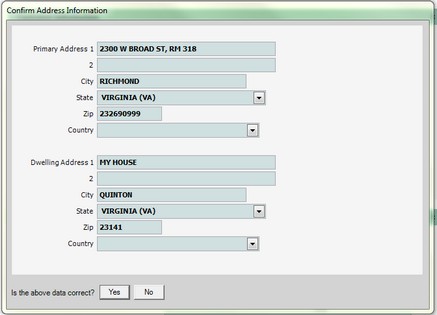
4.Click the Process ![]() button. The system displays the Confirm Address Information dialog. If the information is correct, click the
button. The system displays the Confirm Address Information dialog. If the information is correct, click the ![]() button (at the bottom). If the address information is not correct, click the
button (at the bottom). If the address information is not correct, click the ![]() button to go back to the Change All Addresses (QAS IN) form and enter the correct information.
button to go back to the Change All Addresses (QAS IN) form and enter the correct information.
5.After clicking the ![]() button, the CONFIRM COVER SHEET PRINT dialog opens. Click the Yes or No button, depending on your choice. The transaction is processed. The system then displays the Transaction Details dialog.
button, the CONFIRM COVER SHEET PRINT dialog opens. Click the Yes or No button, depending on your choice. The transaction is processed. The system then displays the Transaction Details dialog.

6.Click the Close ![]() button to close the Transaction Detail dialog.
button to close the Transaction Detail dialog.
7.From the Change All Addresses inquiry form, click the Close ![]() button.
button.
See Also


