Driver's License Issue

Contents
The Driver License Issue transaction is used to issue combined licenses, originals, reissues, duplicates and renewals of driver licenses or permits. Please refer to the Driver's License Guide, as needed.
![]() A customer may start the Real ID Driver’s License Renewal process on DMV's website. However, if a Change Name has also been started on the Web, the alert for the pending DCISS0 transaction will not display.
A customer may start the Real ID Driver’s License Renewal process on DMV's website. However, if a Change Name has also been started on the Web, the alert for the pending DCISS0 transaction will not display.
The customer will have 30 days to come to a CSC to complete the Real ID Driver’s License Renewal process.
![]() For a list of Legal Presence codes, click Here.
For a list of Legal Presence codes, click Here.
Commonly referenced topics:
•Proof of Legal Presence DLG-0701
•Electronic Certification of Birth Certficate DLG-0702
To Issue a Driver's License OR Permit (Combined License, Duplicate, Original, Reissue or Renewal)
![]() Before you begin this process in mySelect, call your next ticket in Q-Flow.
Before you begin this process in mySelect, call your next ticket in Q-Flow.
From the tool bar, click the Q-Data ![]() button. The Customer Console opens.
button. The Customer Console opens.
![]() If the Information Clerk scanned the customer's credential, the customer's information will appear in the Customer Console. If they did not, you must retrieve the customer's information by entering their customer number or name and name type in the appropriate fields, then click the Inquire
If the Information Clerk scanned the customer's credential, the customer's information will appear in the Customer Console. If they did not, you must retrieve the customer's information by entering their customer number or name and name type in the appropriate fields, then click the Inquire ![]() button to Open the Customer Console.
button to Open the Customer Console.
1.Click the Send to Camera ![]() button on the Customer Console button bar.
button on the Customer Console button bar.
![]() Please refer to the Photographing Requirements section of the DLG, as needed.
Please refer to the Photographing Requirements section of the DLG, as needed.
2.Once the picture has been taken, continue with one of the below navigation's to start the Driver's License Issue process.
From the Console Go To ..... |
Steps to Follow ..... |
||||||||||||||||
Alerts Grid |
Information about the customer's Driver's License or Permit may display as one or more of the following alerts:
1.Clicking the 2.Clicking the 3.Clicking the 4.Continue with the steps below. |
||||||||||||||||
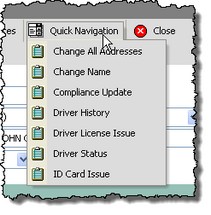
Quick Navigation From the Customer Console screen |
Click the Quick Navigation •Driver's License Issue screen
|
||||||||||||||||
Quick Navigation From the Driver License Issue screen |
Click the Quick Navigation •CDL 10 Year History Check •Compliance Update •Driver License / ID Card Surrender •Driver License History •Driver Status Inquiry •Emergency Contact •Events Selection •ID Card •Orders •SR22/FR44 Add •Test Results Inquiry •Translator Add •Translator Inquiry •Translator Modify •Veteran License/ID Release •Veteran Maintenance
|
![]() Processing the Start Anywhere Real ID Driver’s License Renewal, Reissue or Duplicate from the WEB
Processing the Start Anywhere Real ID Driver’s License Renewal, Reissue or Duplicate from the WEB
After following the web instructions, the customer arrives at the CSC. They MUST present •the email confirmation receipt •the documents selected through the website instructions •and any other original documents required for Real ID.
Open the Customer Console using the customer's number or name. The Alerts grid will display the pending DCISS0 transaction.
Click the The DL1P DRIVER'S LICENSE AND IDENTIFICATION CARD APPLICATION form prints with the customer's information populated. Proceed with the Driver's License Renewal or Reissue or Duplicate process, scanning the original documents.
|
3.The Driver License Issue inquire screen opens. Select the Transaction Type from the drop down ![]() box (Combine License, Duplicate, Original, Reissue, or Renewal).
box (Combine License, Duplicate, Original, Reissue, or Renewal).
If the new credential is to include Real ID, click the Yes radio button, otherwise, click the No radio button. Follow the instructions in DLG-0202 for scanning the documents presented.
4.Click the Inquire ![]() button to open the Driver License Issue transaction form.
button to open the Driver License Issue transaction form.
Top row displays these buttons.
Bottom row displays these buttons. This set of buttons will navigate you to that section on the Drivers License Issue screen. Click the Top
|
![]() Note: If the customer does not have a social security number in the DMV data base, the following message will display.
Note: If the customer does not have a social security number in the DMV data base, the following message will display.
The U.S. Citizen and Voter Registration radio buttons are active and once entered a paper application will print.
5.Enter the required information as indicated by the ![]() icon and any other information necessary based on the Transaction Type and License Type selected.
icon and any other information necessary based on the Transaction Type and License Type selected.
![]() Click here for tips on navigating the Driver's License transaction form.
Click here for tips on navigating the Driver's License transaction form.
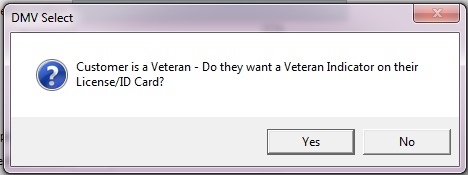
If the customer has the veteran discharge information on file and does not have the Veterans Indicator on their credential, the following pop up message will display. Answer accordingly to the customer's response.
If YES is clicked, the Veteran Status will indicate Verified and the Add Veteran Indicator? radio buttons will be open and YES marked. If the customer changes their mind, click the NO radio button.
If the customer's Veteran Status is Pending, the Pending radio button will be populated and protected as well as the Add Veteran Indicator? radio button.
To release the credential with or without the veteran documents, go to the Veteran ID Card Release transaction. |

6.In the Issue section, the U.S. Citizen and Voter Registration radio buttons are inactive and protected. When the time comes to answer the U.S. Citizen and Voter Registration, the following message box appears.
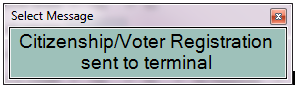
Instruct the customer to answer the questions. Once completed mySelect will send a message of completion.
Click OK to continue.
The U.S.Citizen and Voter Registration radio buttons are now populated according to how the customer answered the questions on the credit card terminal.

7.Click the Process ![]() button.
button.
![]() Depending on the customer's proof of Legal Presence documents, verification will be done via the SAVE interface.
Depending on the customer's proof of Legal Presence documents, verification will be done via the SAVE interface.
![]() If an NDR match is found, a message box displays indicating a match. Also, the eForms button will change to red and display eForms(NDR). Red text will also scroll along the bottom of the window. These indicators will remain until the eForms button is clicked to view the NDR match. Follow the NDR Match process to continue.
If an NDR match is found, a message box displays indicating a match. Also, the eForms button will change to red and display eForms(NDR). Red text will also scroll along the bottom of the window. These indicators will remain until the eForms button is clicked to view the NDR match. Follow the NDR Match process to continue.
![]() When Legal Presence is required and after entering a Legal Presence (LP) code, the Legal Presence Authorization window will pop up. Your manager or designee will review the Legal Presence information entered to verify what was entered.
When Legal Presence is required and after entering a Legal Presence (LP) code, the Legal Presence Authorization window will pop up. Your manager or designee will review the Legal Presence information entered to verify what was entered.
If the customer is using an unexpired passport as the Legal Presence code, mySelect will verify with U.S. Passport Verification Services (USPVS) before the credential is issued. See Passport Verification for more information. Follow the instructions in DLG-0202 for scanning the documents presented.
After your manager or designee has reviewed the information, they will complete the authorization by entering their (COV) User Name and Password which will allow the transaction to continue. Self authorization will not be allowed.
Click the Accept button to complete the authorization and continue the transaction or click the Decline button to exit the authorization and go back to re-enter the information.
 |
| Click to view full size |
mySelect will prompt for the collection of the re-exam fee when initiating a test. •If the payment method for the re-exam fee is a debit/credit/gift card, the payment will transfer to the recalling transaction. •If the payment method is check or cash, continue to provide the revenue to the recalling CSR after collection as you do today. • 1.If a re-exam fee is due mySelect will display a message to collect the fee(s).
2.Click OK to continue. The Transaction Details Payment will display to collect the re-exam fee. The re-exam fee may be collected in any combination of cash, check and/or debit/credit/gift card.
3.Click the
4.Click the OK button and send the customer to the testing area to take the test. The Driver License Issue transaction will automatically closed.
5.Once the customer has completed the testing, the CSR recalling the transaction will need to record the test results in order to continue with issuing the credential. Click Process to continue.
6.Once again the Transaction Details Payment window opens displaying the entire amount due, the remaining amount due and the re-exam fee which was collected earlier. The CSR may collect the Remaining amount due in any combination of cash, check and/or debit/credit/gift card.
7.Click the Process button and continue with step 7. |


8.The Select message box appears to confirm the new expiration date. Click the ![]() button to continue.
button to continue.
![]() If the customer is not testing and you have additional transactions for the customer, click the Add to Cart
If the customer is not testing and you have additional transactions for the customer, click the Add to Cart ![]() button and continue to your next transaction.
button and continue to your next transaction.
9.The Transaction Detail Payment dialog opens. Enter the payment according to the Processing_Payment procedures.
10.Click the Process ![]() button. The Document Imaging Barcode Cover Sheet is printed and the Receipt Details dialog appears. Print the receipt if requested.
button. The Document Imaging Barcode Cover Sheet is printed and the Receipt Details dialog appears. Print the receipt if requested.
11.Click the Close ![]() button to close the Receipt Details dialog. The Transaction Details dialog appears with the TRANSACTION PROCESSED message.
button to close the Receipt Details dialog. The Transaction Details dialog appears with the TRANSACTION PROCESSED message.
12.Click the Close ![]() button to close the Transaction Details dialog.
button to close the Transaction Details dialog.
13.Click the Close ![]() button to complete the transaction.
button to complete the transaction.
See Also